


This document is intended for do-it-yourself installation for in the floor/slab-on grade installs. After you submit your plans to AIM Radiant Heating for correct sizing of our Boiler Room in a Box we will provide you with a layout for how the tubing should be installed. In the floor/slab-on grade installations normally are installed within the basement and/or the garage of the house. The real question to ask yourself is: "Can I install this radiant in the floor system without a contractor/plumber?" The answer is YES!
In this section, we will cover system installation in new construction; where the floor has not yet been installed. If you already have a concrete floor and would like to install radiant heat within the floor, please review our installation for & quot;Existing Floor Installation." The process has been duplicated time and time again for A.I.M Radiant in the floor/slab-on grade & amp; snow melt installations with proven and consistent success. We ask that you follow this process in the order below so as not to encounter any installation problems. Should you run into difficulties, please call us on our 800 number and we will gladly assist you.
We have broken this installation process into 10 steps to provide a clear understanding of how to install a radiant in the floor heating system. Please follow the step-by step-process for proper installation:
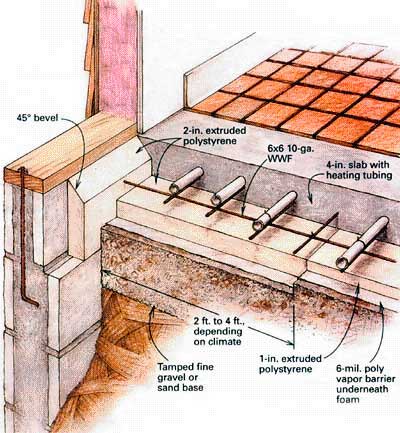
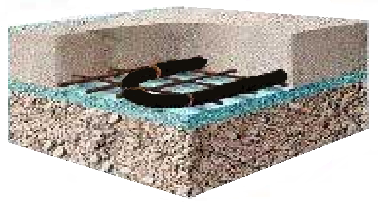
- The contractor will compact the ground where the heating will reside. The compacted section of the base is then followed by a 6 mil polyethylene vapor barrier. Insulation is then installed on top of the vapor barrier. The insulation phase is crucial for a radiant floor. Heated slabs radiate outward rather than downward, so insulation on the edges of the slab is critical. Rememberyour slab will be about 75 degrees F. A cooler surface in contact with the slab will try to "steal" its heat. If you pour up against your foundation walls, insulate between the slab and the walls. How much you insulate under the slab depends upon the function of the heated space. If the heated area is living space, used on a day to day basis, then insulate with at least 1" EPS Foam (pink or blue board). After the insulation is laid, you will then lay the wire mesh on top. The wire mesh panels are used to hold the tubing in place. AIM suggests using sheets of wire mesh, as it is easier to attach tubing. After insulation and wire mesh have been put in place, we are now ready to begin the tubing installation.
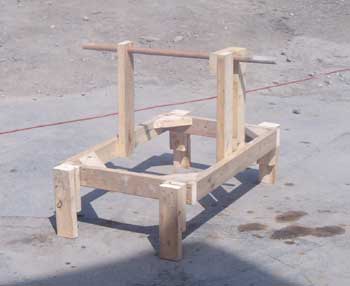
- Unpack all of the tubing and place it on a clean surface (dont put it on the ground where you can get sand or dirt in the tubing, causing damage to the system). Unwrap the tape from the tubing. You will need to build a tubing feeding system so that you dont run into difficulties while laying the tubing. You will need to put a piece of pipe or wood (4X4) between two step ladders or saw horses to act as an uncoiler for the PEX tubing (see picture).
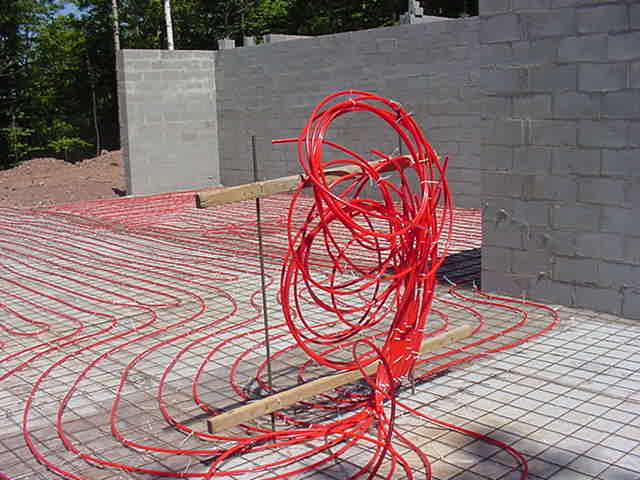
 Before you begin to tie the tubing in place (using plastic pipe ties, first label the tubing with electrical tape to signify the supply an return lines (see picture below). In this picture we use black as the return line and duct tape as the supply line. This makes the process move much more quickly when installation begins and removes any guesswork when connecting to the manifold system from the Boiler Room in a Box. NOTE: Using several people to lay the tubing makes the installation process easier.
 - Once the tubing is labeled and set up for uncoiling, be sure you are familiar with how the layout will occur. This is important because you need to know how the supply and return lines will be brought back to the Boiler Room in a Box. AIM can help with layout of the tubing system should you require; send your floor plan and we will help with the layout. In this phase, start tying down the return portion of the tubing firstallowing you to make sure you have enough tubing left to connect to the manifold system that comes with the Boiler Room in a Box. We require that you keep at least an additional 10-12 feet of tubing from both the supply and return sections. See next section for details.
- Using a pipe tie, attach the return portion of the tubing to the mesh; allowing at least 10 feet of additional tubing length wherever you mount the Boiler Room in a Box. If your boiler room is going to be in the middle of your basement, you need to create solution to hold tubing in place.
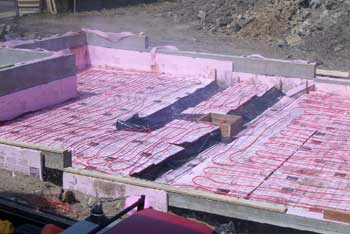
 Notice in the picture below how we tied the tubing to a temporary stand within the center of the soon-to-be-concrete floor. We have done this because the boiler room is within an interior section of the basement. You can create a similar system if you are going to have the boiler room on an exterior wall as well. When you tie the first supply to the mesh make sure that, as you continue along ,you allow enough room in front of where you will tie the tubes up to accommodate both supply and return tubing feeds.
IMPORTANT: When you attach the tubing using the pipe ties you will need to either twist the ties so that the ends dont stick up (rotate to put the tie ends to the insulation) or cut off the excess. You must do this so that you dont have plastic pipe tie ends coming up through the basement floor.
Notice in the picture below how we tied the tubing to a temporary stand within the center of the soon-to-be-concrete floor. We have done this because the boiler room is within an interior section of the basement. You can create a similar system if you are going to have the boiler room on an exterior wall as well. When you tie the first supply to the mesh make sure that, as you continue along ,you allow enough room in front of where you will tie the tubes up to accommodate both supply and return tubing feeds.
IMPORTANT: When you attach the tubing using the pipe ties you will need to either twist the ties so that the ends dont stick up (rotate to put the tie ends to the insulation) or cut off the excess. You must do this so that you dont have plastic pipe tie ends coming up through the basement floor.
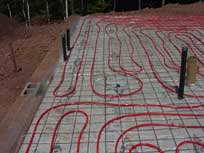
- Tie the tubing spaced 9 inches on center (when you use the wire mesh sheets they are spaced every 6 inches) so you can run the tubing next to the wall and use the mesh to guide you along. Using the outside edge of the mesh, come over a square and a half and then tie tubing approximately every 1-2 feet keeping it as straight as possible.
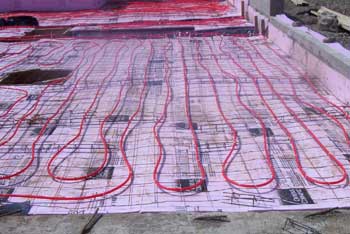
- The easiest way to create the bend is to first tie the pipe down approximately 6 inches before the top of the bend. After your tie is in place, bend the tube so that you can tie it down 9 inches away using a total of 3 ties. Continue the process for all the bends but be careful not to make the loops too tight as you may kink the tubing.
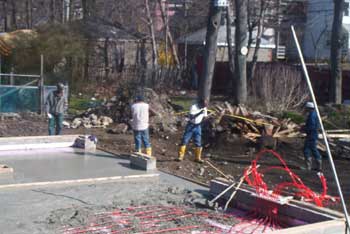
- Now that you have one portion of your tubing in place, you should notice a hole in the center of the floorsoon to be a wall or column of your home. You will need to make sure that when you run the tubing you avoid areas that will be weight baring walls or columns, pipes or other related items. Let these pictures guide you in how to avoid these installation hurdles.
- Now that you have tied all the tubing to the mesh in 300 foot lengths, you are almost ready to pour the concrete. First you must make sure that that all supply and return tubing is brought together at a central location.
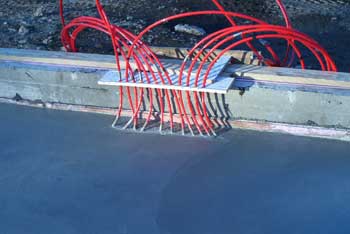
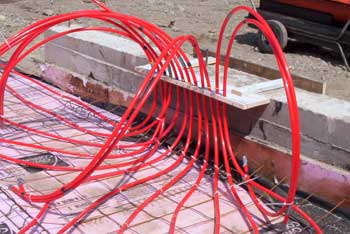 Notice that we have labeled the tubing with back and silver tape to depict the differences between the supply and return lines. We have made a template here to hold the tubing in place before we pour, but you can use just pipe ties to hold the tubing without this type of holder. This is important because you dont want to have pipes coming up from different parts of the floor. Make sure that the tubing comes up at one central location where the Boiler Room in a Box will reside. It is critical that the tubing will reach the manifolds of the system so keep 10-12 additional feet of tube length from where you will tie the system down, this will give you enough room to connect to the system.
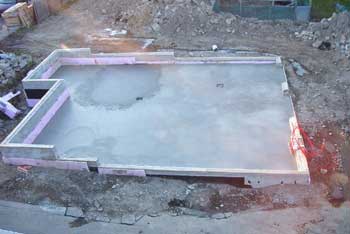
 - Now that you have the tubing in place, you are now ready to pour the concrete. Make sure that when they pour, they completely submerge the tubing within the concrete slab. They should pour the concrete and smooth out the surface.
- Once the concrete has set, you are now ready to attach the supply and return sections of the tubing to the manifold system. Once you add water to the system, you will need to balance the system and you are ready to heat your home. Congratualtions! You now have a radiant in the floor heating system.
IMPORTANT: Each run will consist of no more than 300 feet of tubing. If you use more than 300 foot intervals you will have too much friction loss, causing an excess temperature differential. This causes extreme temperature differences within the room. In other words, keeping 300 foot tubing lengths allows you to keep consistent temperature throughout the floor.